
Never scooping litter again is a tempting idea — no clay dust on the bathroom floor, no 20-pound bags to haul, no covered box quietly stinking in the corner. Toilet training a cat is genuinely possible, and thousands of owners have done it successfully with a gradual, structured approach.
But it is not a weekend project, it is not right for every cat, and most feline veterinarians will tell you there are real trade-offs worth understanding before you start. This guide walks through the full process — candidate screening, equipment, a week-by-week transition plan, troubleshooting, hygiene, and the honest reasons you might decide to stick with a litter box after all.

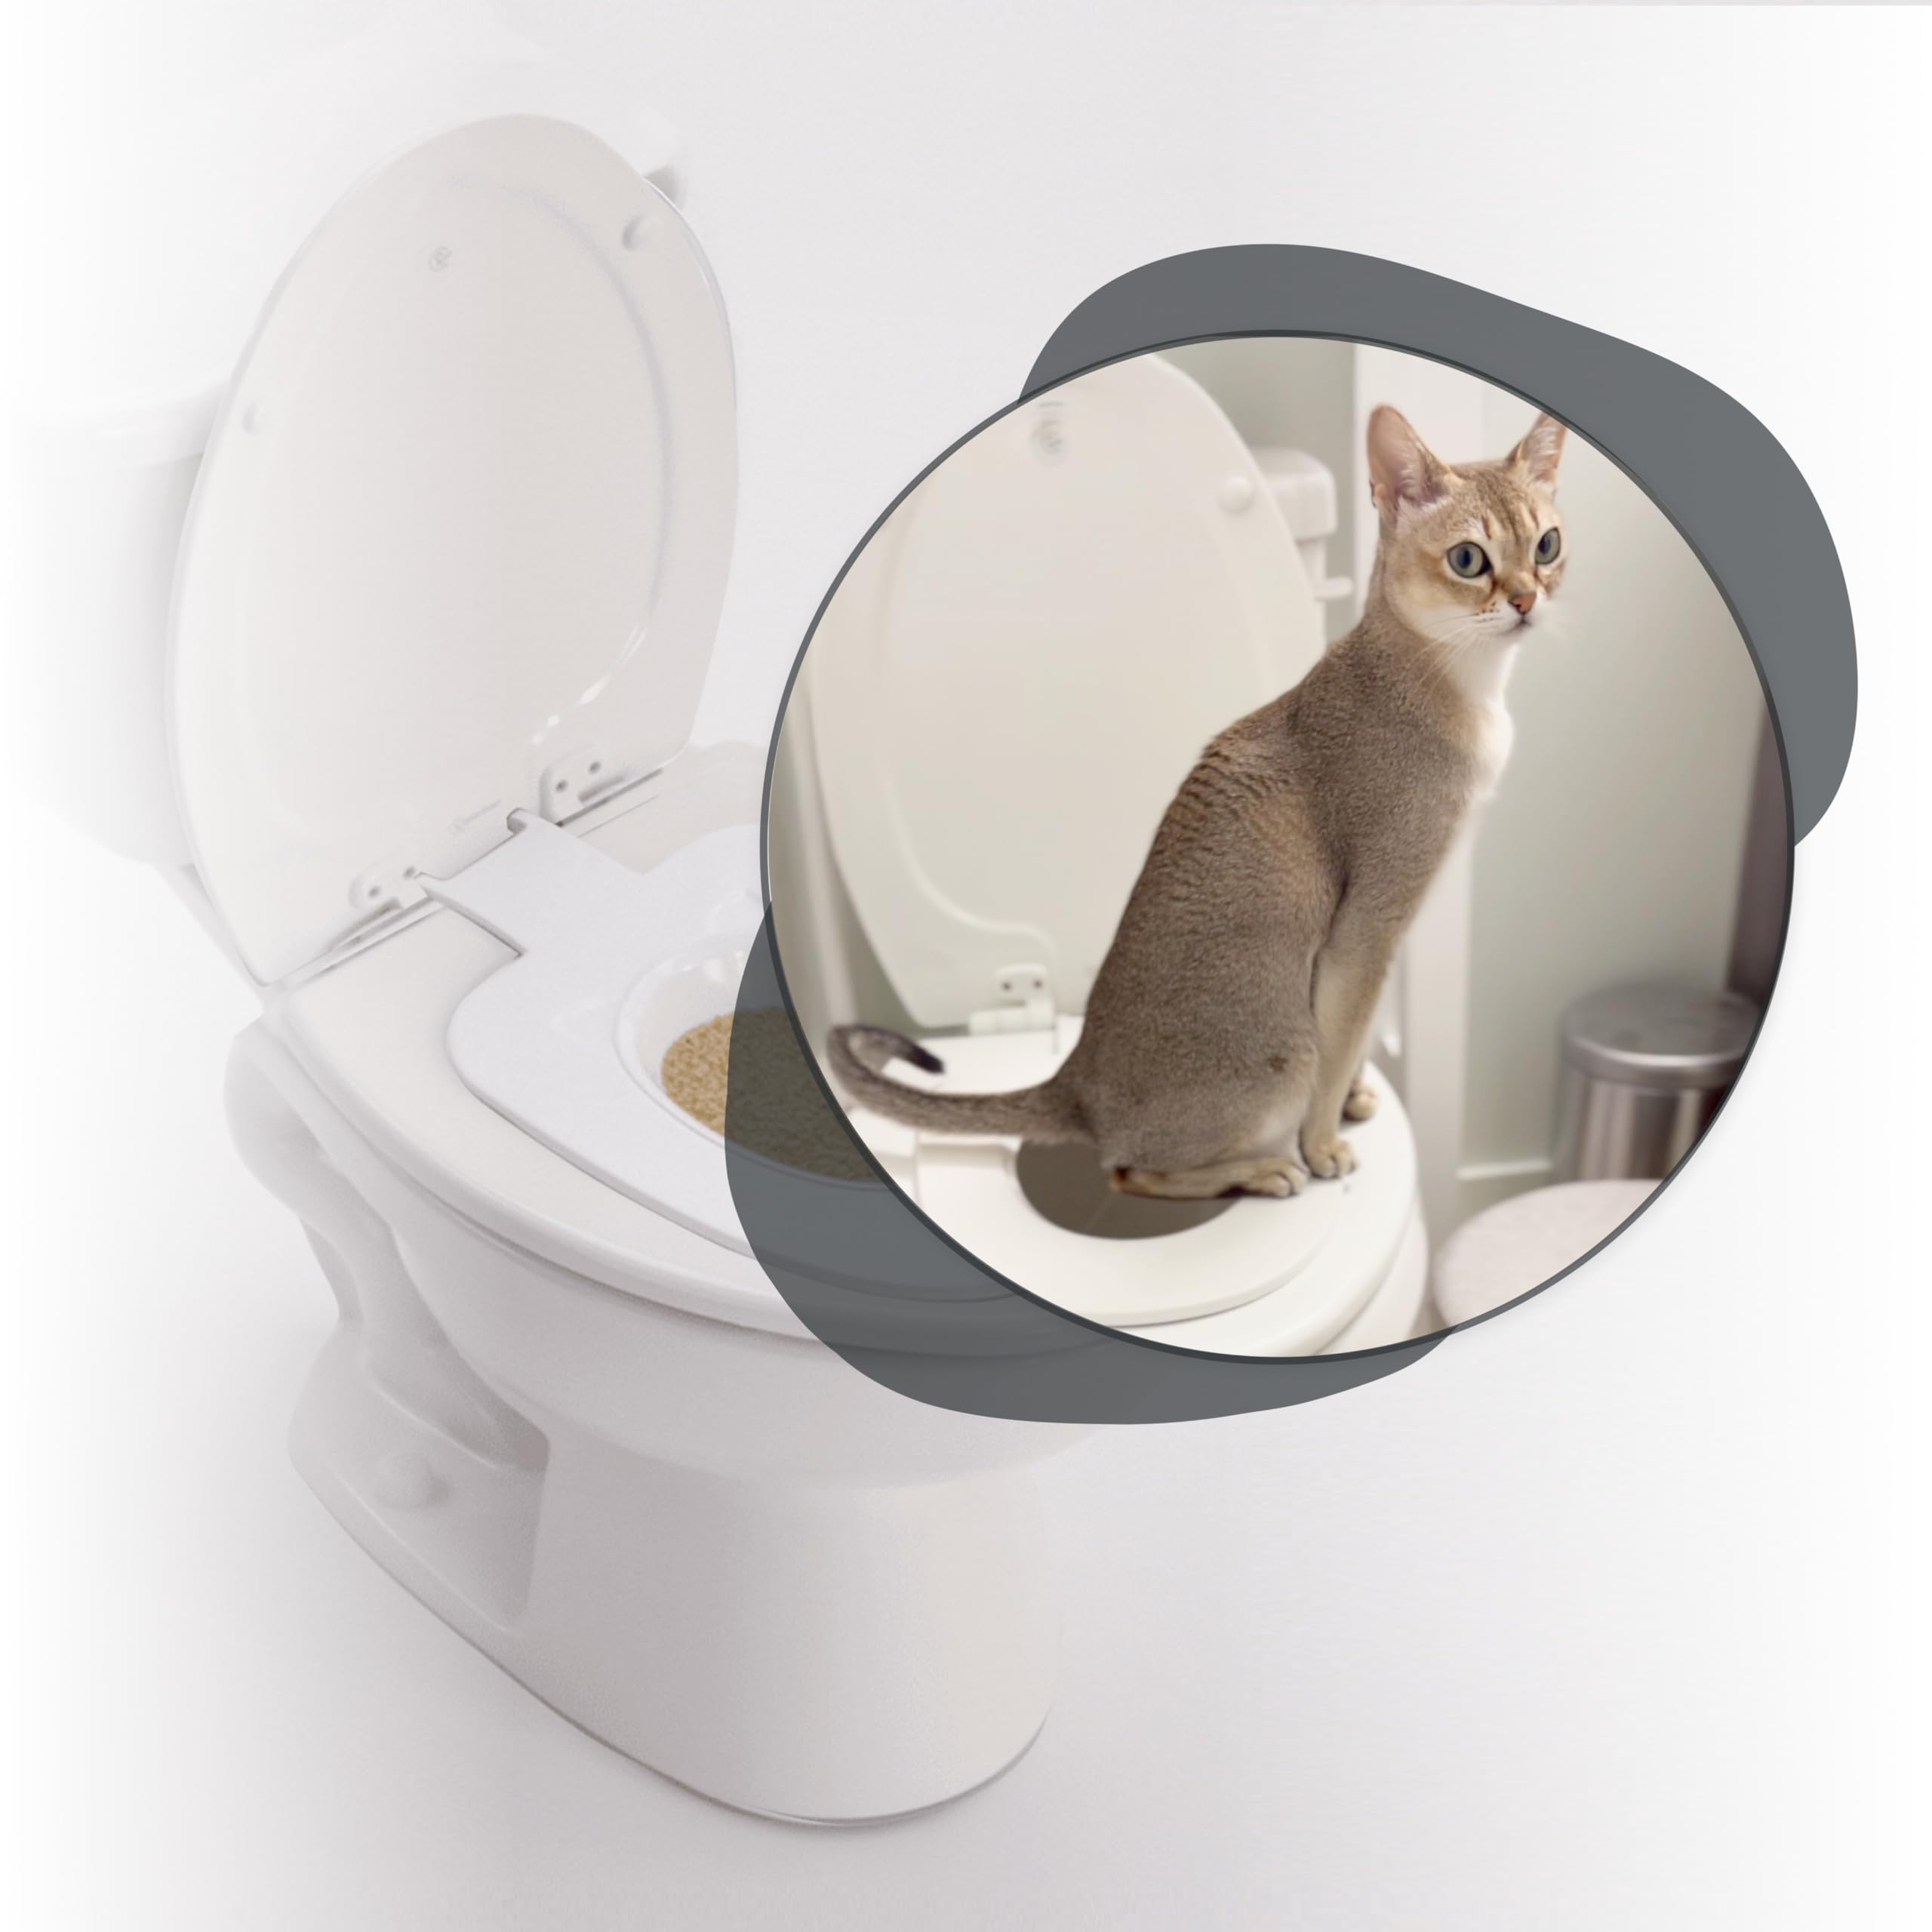
A toilet-trained cat balances on the rim rather than squatting inside — the posture you are ultimately training for.
Credit: www.youtube.com
The Short Answer
Toilet training works by moving the litter box to the bathroom, raising it to seat height over several weeks, transferring it onto the toilet, then slowly opening a hole in a training insert until the cat is straddling bare porcelain. Expect 8 to 16 weeks for a confident adult cat, longer for a cautious one.
| Stage | Typical duration | What success looks like |
|---|---|---|
| Relocate box to bathroom | 5–7 days | Cat uses box in its new spot without hesitation |
| Raise to toilet height | 2–4 weeks | Cat jumps up and eliminates calmly |
| Box on closed toilet lid | 1–2 weeks | Confident jump, no litter kicked out |
| Training seat, hole closed | 1–2 weeks | Cat stands on the seat, not the rim only |
| Widening the hole (3–4 increments) | 3–6 weeks | Cat balances on all four paws around the gap |
| Seat removed | 1–2 weeks | Cat uses the bare toilet unaided |
The single biggest predictor of success is not rushing a stage. In practice, most failures happen because an owner enlarged the hole too soon and the cat's back paw slipped into water — one bad experience can undo a month of progress.
Before You Start: Is Your Cat a Good Candidate?
Not every cat should be toilet trained. Run through this screening honestly.
Good candidates
- Aged roughly 1–8 years, agile, and confident on countertops or shelves
- Healthy weight with no arthritis, hip dysplasia, or vision loss
- Single-cat household, or a household where every cat can be trained
- Uses the litter box reliably now, with no history of house-soiling
- Curious, food-motivated, and adaptable to change
Poor candidates
- Kittens under about 6 months — they cannot balance safely and can drown
- Senior cats or any cat with mobility, joint, or neurological issues
- Declawed cats, who often have altered grip and chronic paw discomfort
- Anxious, timid, or recently rehomed cats still settling in
- Cats with a history of urinary blockages, cystitis, or kidney disease
- Households with dogs who raid toilets, or with small children who close the door
Temperament genuinely matters here. Some lines are famously bold and mechanically curious, while others startle at a moved rug — if you are unsure where yours falls, it is worth thinking about breed-linked personality traits and how much novelty your cat normally tolerates.
The Honest Trade-Offs Vets Want You to Know
A good article on this topic cannot only sell the upside. Here are the drawbacks that experienced owners and veterinary professionals raise most often.
1. You lose your best early-warning system. Clumping litter tells you the size, number, and frequency of urine clumps. That is how many owners catch chronic kidney disease, diabetes, and feline lower urinary tract disease weeks before a cat looks sick. Once waste goes down the drain, that daily data disappears. Veterinary resources such as Cornell's feline health program consistently emphasise changes in urination as a first sign of illness.
2. It fights a hardwired instinct. Cats bury waste to manage scent and social signalling. Removing the substrate entirely can be a low-grade stressor, and stress is directly linked to idiopathic cystitis.
3. Access must be perfect, forever. A closed bathroom door, a lowered lid, a guest staying over, or a house-sitter who does not know the rules can trigger an accident on your rug. You must also give up the lid-down habit permanently.
4. Flushing cat faeces is discouraged in many areas. Cat waste can carry Toxoplasma gondii, and treatment plants are not designed to inactivate the oocysts, which is why public-health guidance from bodies like the CDC recommends bagging cat waste rather than flushing it — particularly if you live near coastal watersheds. Some municipalities and septic-system guidelines say the same.
5. Older cats often regress. A cat that trained at three may struggle to balance at twelve. Plan to keep a litter box in storage.
If any of that gives you pause, that is a legitimate answer — a low-odour setup with hands-off daily scooping gets you most of the convenience with none of the risk.
Real Benefits of Toilet Training
For the right cat and household, the payoff is substantial.
No litter to buy or carry. A single cat typically gets through roughly 20–30 pounds of clumping litter a month. Across a decade that is a meaningful running cost, plus a monthly errand you never have to think about again.
Odour disappears at the source. Waste goes straight into water and gets flushed, so ammonia never has time to build. Owners of studio apartments and homes with a single bathroom notice this most — no more strategically placed odour-control add-ons or air fresheners fighting a losing battle.
You reclaim floor space. A standard box plus its mat occupies three to four square feet in a spot you would rather use for something else.
Less tracked litter. No grit on bare floors, no dust plume when you pour a fresh bag, no crunching underfoot at 2 a.m.
Cleaner surfaces. A litter box is a warm, damp reservoir; the toilet gets flushed and cleaned routinely.
Be realistic about the maths, though. If odour is your main complaint rather than cost, a well-ventilated modern tray solves it faster and with zero training risk. Many owners get the same result simply by upgrading the tray itself and scooping twice daily.
Choosing the Right Equipment
Litter Boxes That Set You Up for Success
Before you touch a training kit, make sure the box you are transitioning from is one your cat genuinely likes. A cat that already tolerates its box grudgingly will not cooperate with a harder version of the same task.
- Open pans — best for toilet training, because they mirror the exposed feel of a toilet seat. Choose one at least 1.5× your cat's body length.
- Covered boxes — good for privacy and odour containment, but they teach the opposite of what you want. If yours is covered, remove the hood a week before you begin.
- Self-cleaning and mechanised units — convenient, but their high walls and moving parts make the eventual jump to a flat rim a bigger leap.
- Multi-cat arrangements — the standard guidance is one box per cat plus one; homes running shared-household setups need every cat on board or training will stall.
Toilet Training Kits
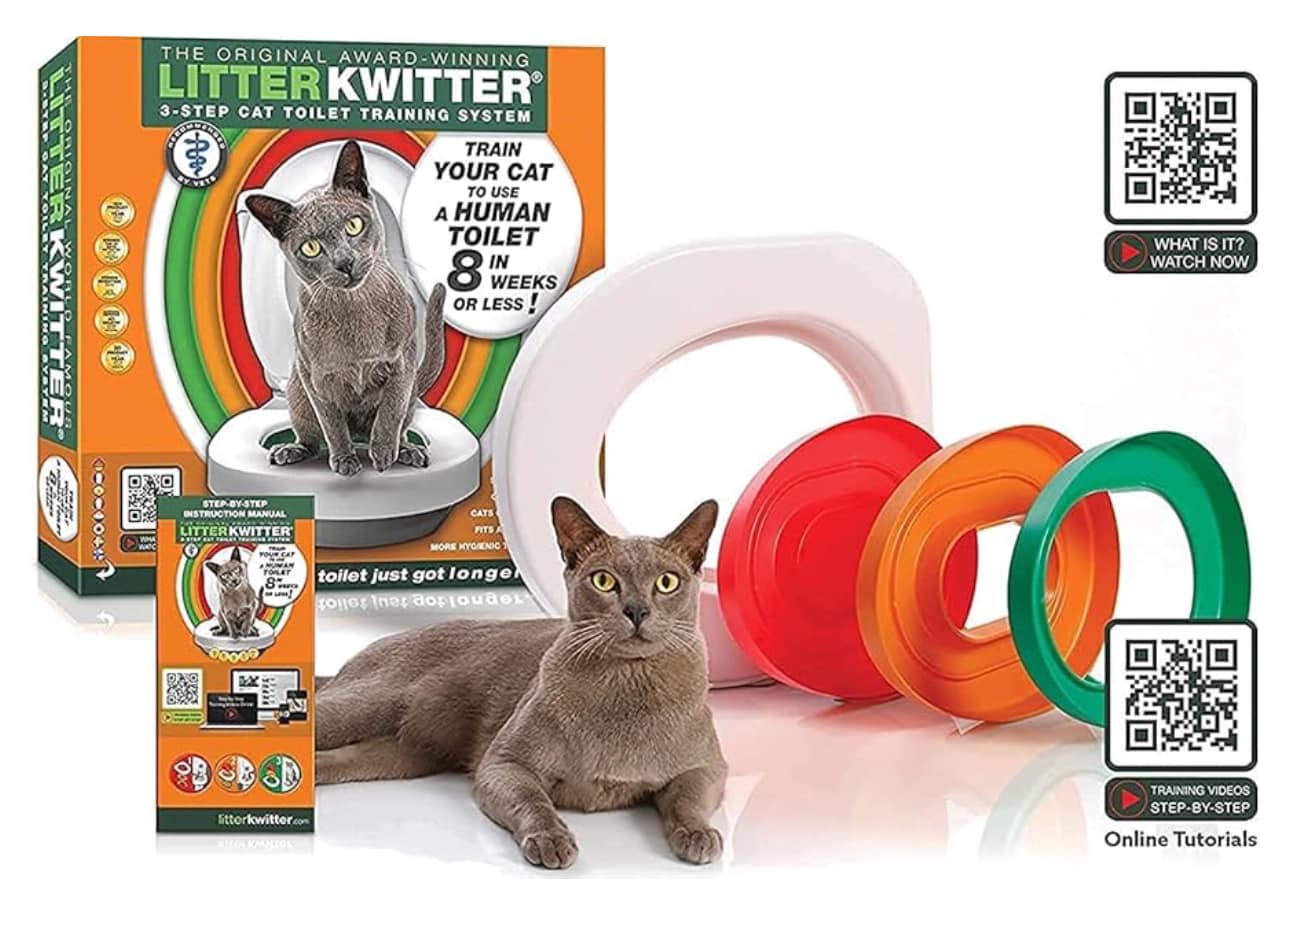
A kit is essentially a rigid insert that sits under the toilet seat and holds a shrinking amount of litter. The three formats you will find are:
| Kit style | How it works | Best for |
|---|---|---|
| Staged ring system | Colour-coded discs with progressively larger holes | First-timers who want a clear roadmap |
| Single-tray, cut-your-own | One flexible tray you enlarge yourself | Cats needing very small, custom increments |
| Adjustable insert | Sliding panel widens the opening | Owners who want to reverse a step easily |
Whichever you pick, three features matter more than the brand: a secure fit under your specific seat shape (elongated vs. round), a rim strong enough to hold your cat's full weight without flexing, and the ability to go backwards to a smaller opening if your cat regresses.
If you are weighing designs, our breakdown of ready-made transition systems covers fit, durability, and which styles hold up under a 15-pound cat.

A typical training insert: the tray sits between the toilet bowl and the seat, holding a thin layer of litter.
Credit: www.amazon.com
Litter for the Transition
Switch to a flushable, biodegradable litter (corn, wheat, walnut, or paper-based) before you start. Clay and crystal litters can clog plumbing and damage septic systems when they inevitably fall into the bowl. Use only a thin layer — half an inch is plenty in the insert.
Preparing Your Cat
Start With a Health Check
Book a vet visit before week one. You want confirmation of normal joint mobility, healthy weight, clean urinalysis, and no early kidney changes. Mention your plan explicitly — a vet who knows you are toilet training will suggest a monitoring schedule to compensate for losing litter-box observation.
Hydration matters more once litter is gone, because you will not see urine volume. Cats on moisture-rich diets generally produce more dilute urine and are less prone to crystal formation, which is a sensible insurance policy during and after training.
Set Up the Bathroom
- Choose one toilet and commit to it. Cats generalise poorly between locations.
- Fit a doorstop or remove the door latch so the door cannot swing shut.
- Keep the seat down and the lid up, permanently.
- Add a non-slip mat in front of the toilet for grip on landing.
- Ensure a nightlight — cats navigate the jump more confidently with some ambient light.
- Move food and water bowls out; cats will not eliminate near their food.
Read Your Cat's Signals
Learning to spot hesitation early is what separates a smooth training run from a stalled one. Ears rotating back, a paused approach, sniffing then walking away, or eliminating just beside the box all mean "too fast, go back a step." Owners who are already fluent in decoding everyday feline habits will catch these cues days before an accident happens.
Note the four-paw stance on the seat rim — this balance point takes several weeks to build.
Credit: www.facebook.com
The Step-by-Step Training Process
Phase 1 — Relocate the Box (Days 1–7)
Move the litter box into the bathroom, on the floor, beside the toilet. Change nothing else. Wait until your cat has used it normally at least six or seven times before advancing.
Phase 2 — Gain Height (Weeks 2–5)
Raise the box by 1–2 inches every three days using stacked plywood, magazines taped together, or sturdy boxes. Tape the platform so it cannot shift; a wobble at this stage is the classic cause of refusal.
Watch for a cat that hesitates before jumping. If that happens twice, drop back one increment for a week. Standard toilet height is around 15–17 inches, so budget three to four weeks here.
Phase 3 — Onto the Toilet (Weeks 5–7)
Once the box is level with the closed lid, place it directly on the lid and remove the platform. Keep it there for at least 7–10 days. Many cats need this whole stage just to trust that the surface is solid.
Phase 4 — Introduce the Insert (Weeks 7–13)
Remove the box, close the seat over the training insert, and put a thin layer of flushable litter in the tray. Do not open a hole yet.
Then enlarge the opening in small stages, holding each for at least 7 days of clean use:
- Small centre hole (about 2 inches) — cat still squats mostly on litter
- Medium (about 4 inches) — front paws move onto the rim
- Large (about 6 inches) — cat straddles, back paws on the rim
- Insert removed
Reduce the litter as the hole grows. By stage three there should be barely a dusting left.
Phase 5 — Bare Toilet (Weeks 13–16)
Remove the insert entirely. Expect a few tentative days. Keep rewarding every successful use for at least two more weeks so the behaviour stays reinforced after the novelty wears off.
Reinforcement: How to Actually Reward This
Cats do not respond to correction — they respond to precise, well-timed reward. Two rules:
- Mark the moment. Say a soft "yes" or use a clicker the instant your cat jumps down, not thirty seconds later. Timing within one to two seconds is what builds the association; a compact marker training tool makes this far easier than voice alone.
- Pay well. Use something reserved exclusively for training — freeze-dried chicken, a lickable tube, a sliver of tuna. Everyday kibble is not motivating enough. Owners who keep a stash of high-value rewards near the bathroom door report noticeably faster progress.
Never scold an accident, never place the cat physically on the seat, and never hold it there. Both create avoidance of the bathroom itself, which is the hardest problem to reverse.
The same principles apply across every skill you teach a cat, and our guide to broader behaviour coaching covers shaping, luring, and session length in more detail.
Common Challenges and How to Fix Them
| Problem | Likely cause | Fix |
|---|---|---|
| Cat eliminates on the bathroom floor | Hole widened too fast | Revert one stage for 7–10 days |
| One back paw slips into the water | Insert flexing or hole too big | Replace with a rigid insert; go back a stage |
| Cat stops using the toilet suddenly | Pain, UTI, or stress event | Vet visit first — assume medical until ruled out |
| Litter scattered around the base | Too much litter in the tray | Reduce to a half-inch dusting |
| Cat only urinates, defecates elsewhere | Defecation posture needs more security | Slow the hole progression; keep a low-sided box available |
| Refuses after a house guest | Door was shut or lid was down | Reset access rules and re-reward for a week |
A common mistake is treating a regression as disobedience. It almost never is. Regression is information: something about the setup, the cat's body, or the household changed. Solve the cause and progress resumes.
Clean any accident with an enzymatic cleaner, not ammonia-based products — ammonia smells like urine to a cat and invites a repeat.
Maintaining Hygiene After Training
- Flush immediately where practical. Standing waste is the main odour source and a deterrent for a fastidious cat.
- Use cat-safe cleaners. Avoid pine oil, phenols, and undiluted bleach residue on the seat and rim, all of which are irritating or toxic to cats. Wipe the seat with a mild, thoroughly rinsed cleaner daily.
- Skip in-tank bowl tablets. Blue or chlorinated tank water is water your cat may drink or step in.
- Keep the rim dry. A wet seat is a slip hazard and the fastest way to lose your cat's confidence.
- Wash the floor mat weekly.
- Bag rather than flush solids where local guidance or a septic system calls for it.
Grooming habits are also part of the picture, since a cat that has slipped or stepped in water will over-groom its paws — a quick check during your normal routine, alongside general coat and paw maintenance, catches irritation early.
Special Situations
Multi-cat homes. Train one cat at a time only if you keep a litter box available for the others in a separate room — otherwise the untrained cats will use the raised box and confuse the whole process. Realistically, whole-household training is a six-month project.
Travel, boarding, and vet stays. A toilet-trained cat put in a carrier or cattery will need a litter box again. Reintroduce one for a day or two before travel so the transition is not abrupt.
Ageing cats. Reassess balance annually from about age ten. Stiffness in the hips is the usual reason a long-trained cat starts missing. Going back to a low-entry tray is not failure — it is good welfare.
Power outages, plumbing work, and moves. Always keep one clean litter box and a small bag of litter in storage. You will need it eventually.
Keeping a Backup Plan
Roughly speaking, a minority of cats never fully complete the transition, and a further group succeeds then regresses years later. Neither outcome is a disaster if you plan for it.
Keep a spare tray somewhere accessible and reintroduce it the moment you see two accidents in a week. For households that revert permanently, the modern middle ground is a low-maintenance setup — an automated tray plus a sealed waste drawer removes most of the scooping and odour that pushed you toward toilet training in the first place.
Also keep the basics right during any transition: consistent feeding, keeping parasites at bay with year-round prevention, and no simultaneous changes such as a new pet or a house move. Behaviour training only works on a stable baseline, so if you are also updating long-lasting collar options or switching foods, do it before training starts, not during.
Ready to start? Pick your kit first and set up the bathroom this weekend — a rigid, adjustable insert that fits your seat shape is the single piece of gear that decides whether week nine goes smoothly or goes backwards.
Frequently Asked Questions
How long does it take to train a cat to use the toilet?
Plan for 8 to 16 weeks, not the "3 weeks" some kit packaging suggests. Fast, confident cats occasionally finish in six; cautious ones take five or six months. The timeline is driven by how many days you hold each stage, so counting successful uses rather than calendar days is the more reliable measure — aim for at least seven clean uses before advancing.
Is it possible to train a cat to use the toilet?
Yes. Cats are physically capable of balancing on a toilet rim and are strongly motivated to eliminate in a consistent, clean location. The behaviour is trainable through gradual approximation — moving the target one small step at a time toward the goal. What cats cannot learn is flushing, or opening a closed bathroom door.
How successful is toilet training for cats?
Success varies widely and depends far more on the cat than on the method. Agile, food-motivated adults in single-cat homes have the best odds. Timid cats, kittens, seniors, overweight cats, and multi-cat households have markedly lower success rates. Honest expectation: assume a real chance it will not work, and be ready to stop without frustration.
Are cats naturally toilet trained?
No. Cats have a strong instinct to eliminate in loose, diggable substrate and to bury waste afterwards — which is why litter box training is nearly effortless. Toilet training deliberately overrides that instinct, which is precisely why it takes months rather than days.
Can kittens be toilet trained?
Not safely. Kittens under six months lack the balance and leg length to straddle a toilet, and there is a genuine drowning risk. Start no earlier than 12 months, once the cat is fully grown and jumping confidently onto counter-height surfaces.
Will I still be able to spot health problems?
Not as easily, and this is the strongest argument against toilet training. Compensate by weighing your cat monthly, tracking water intake, watching for straining or repeated trips to the bathroom, and scheduling twice-yearly urinalysis for cats over seven. Any cat straining without producing urine is an emergency — male cats especially.
Should I flush my cat's waste?
Urine is generally fine. For faeces, public-health guidance in many regions advises bagging and binning rather than flushing, because Toxoplasma oocysts survive standard wastewater treatment and can reach waterways. Check your local water authority's guidance, and never flush clay-based litter.
What if I have more than one cat?
Train sequentially and keep at least one accessible litter box for the untrained cats throughout. If even one cat cannot or will not train, you will be keeping a litter box permanently — in which case the cost and odour benefits largely disappear, and a better-designed box is the smarter investment.
Final Thoughts
Toilet training a cat is a legitimate, achievable project — but it is a slow, evidence-led behaviour programme, not a hack. The owners who succeed are the ones who move in one-inch increments, hold every stage until the cat is bored of it, reward instantly and generously, and treat every regression as feedback rather than defiance.
Before you begin, be sure your cat is the right age, weight, and temperament; get a vet's sign-off; commit to permanent bathroom access; and set up a way to monitor urinary health once the litter clues are gone. If any of those conditions are shaky, choosing a better litter box is not a compromise — it is the correct decision.
If you are going ahead: set the box in the bathroom today, buy a bag of flushable litter, and stock the treats you will need for the next three months. Small, patient steps are what get you to a litter-free home — and a cat that is still relaxed, confident, and healthy when it gets there.